All documents related to this post can be found in my repository.
Day 19 makes our data visible. Since Day 16, we’ve been logging sessions to SQLite. Since yesterday, we’ve been analyzing them with a REST API. But so far, we’ve only seen JSON responses. That changes today. We’re building a standalone dashboard that visualizes sessions, displays agent activity, shows tool usage, and receives real-time updates via WebSocket.
So what exactly is WebSocket?
WebSocket is a bidirectional communication protocol over a persistent TCP connection. Unlike HTTP (request-response), it enables real-time data exchange in both directions. The server can push data to the client at any time without the client having to request it. Perfect for live updates, chat, or dashboards.
The Problem
The Analytics API delivers data. But JSON isn’t particularly intuitive. Who wants to scroll through arrays of message objects to understand which agent was most active? Who wants to read tool statistics as columns of numbers? Sometimes that’s fun, sure, but… 🤷♂️
We “need” a visualization. Charts that show patterns. Timelines that display activities and dashboards that provide insights at a glance.
The Solution
We’re building a dashboard system that builds on Day 18’s analytics format. The backend uses FastAPI and serves both HTML pages and WebSocket connections for real-time updates. The visualizations are rendered with Chart.js. The frontend fetches data from the analytics endpoints and presents it in an interactive user interface.
The dashboard itself lives entirely in the day_19/ directory. However, the Heist Runner requires the agent infrastructure from Day 17 as well as the services from Day 16 (OAuth, Memory Service, Tool Discovery). The dashboard can also be used without running heist sessions - it then visualizes already stored data from the analytics database.
By the way, the dashboard is completely vibecoded. I had zero experience with HTML before this 😄
Architecture and Dependencies
Day 19 consists of four main components:
- Analytics Orchestrator: The orchestrator (
orchestrator_analytics.py) uses the database schema from Day 18 with an aggregatedtool_usagetable. It imports agent classes from Day 17 (DiscoveryIntegratedAgent,ConfigLoader, etc.) and requires the running services from Day 16/17 (OAuth, Memory, Tool Discovery). - Session Analytics: Local copy of
session_analytics.pywith adjusted defaults forheist_analytics.db. - Dashboard Server: FastAPI server on port 8007 with YAML configuration (
config.yaml). This is independent of the other services and only reads from the database. - Frontend: Single-page application with Cyberpunk 2077-inspired design. 100% vibecoded.
The dashboard itself is read-only and doesn’t require running services. It only reads from the database. The Heist Runner, however, requires the Day 16/17 infrastructure to generate new sessions.
One more note about the dashboard: There’s a Threat Detection section. It’s currently only present in the UI but not yet functionally implemented.
Database Schema
Day 19 uses the Day 18 Analytics format with aggregated tool usage:
-- Aggregated Tool Usage (no turn_id)
CREATE TABLE tool_usage (
    id INTEGER PRIMARY KEY AUTOINCREMENT,
    session_id TEXT NOT NULL,
    tool_name TEXT NOT NULL,
    operation TEXT DEFAULT 'execute',
    usage_count INTEGER DEFAULT 0,
    success_rate REAL,
    FOREIGN KEY (session_id) REFERENCES sessions(session_id)
);
Difference from Day 16/17:
- Day 16/17: Uses
DatabaseManagerwith individual tool_usage entries (withturn_id) - Day 18/19: Uses new
AnalyticsDatabaseManagerwith aggregated statistics (withoutturn_id)
AnalyticsDatabaseManager (New in Day 19)
Day 19 introduces a completely new database manager specifically designed for Day 18’s analytics schema. Unlike the DatabaseManager from Day 16, this manager aggregates tool usage data:
class AnalyticsDatabaseManager:
    """
    New database manager for Day 18/19 analytics schema.
    Differs from Day 16 DatabaseManager through:
    - Aggregated tool_usage table (no turn_id)
    - Separate tool_calls table for individual calls
    - Additional agents and actions tables
    """

    def store_tool_usage(self, session_id: str, turn_id: int, agent_name: str,
                        tool_name: str, params: str, result: str, success: bool):
        """Compatibility method for Day 16/17 agents."""
        # Delegate to store_tool_call, ignoring turn_id and detailed params
        self.store_tool_call(session_id, agent_name, tool_name, success)

    def finalize_tool_usage(self, session_id: str):
        """Write aggregated stats at end of session."""
        for tool_name, stats in self.tool_usage_cache[session_id].items():
            usage_count = stats['count']
            success_rate = stats['success'] / usage_count if usage_count > 0 else 0.0
            # INSERT aggregated data...
The AnalyticsDatabaseManager was deliberately renamed (instead of simply DatabaseManager) to avoid confusion with the Day 16 manager.
Configuration
Day 19 uses two YAML configs:
Dashboard Configuration
config.yaml for dashboard-specific settings:
# Database Configuration
database:
  path: "heist_analytics.db"  # Local analytics DB

# Dashboard Server Configuration
server:
  host: "0.0.0.0"
  port: 8007
  title: "Heist Analytics Dashboard"
  reload: false

# Chart Configuration
charts:
  agent_colors:
    planner: "#00ffff"     # Cyan
    hacker: "#00ff00"       # Neon Green
    safecracker: "#ffff00"  # Yellow
    mole: "#ff00ff"         # Magenta
Agent Configuration
agents_config.yaml for the Heist Runner:
# LLM Configuration
llm:
  base_url: "http://localhost:1234/v1"
  model: "google/gemma-3n-e4b"
  temperature: 0.7
  max_tokens: 1000

# Database Configuration
database:
  path: "heist_analytics.db"  # Same as dashboard

# Session Configuration
session:
  max_turns: 10
  turn_order: ["planner", "hacker", "safecracker", "mole"]
Both configs point to the same heist_analytics.db in the day_19/ directory.
CLI Integration
Things get a bit more dynamic as we now introduce command-line interface integration.
Heist Runner
Day 19 has its own heist runner with CLI arguments. This means we can pass parameters when starting the script to modify the run without changing anything in the configuration.
# run_heist.py
def main():
    parser = argparse.ArgumentParser(
        description='Run Heist Session with Multi-Agent System'
    )
    parser.add_argument('--config', '-c', type=str, default="agents_config.yaml")
    parser.add_argument('--discovery-url', '-d', type=str, default="http://localhost:8006")
    parser.add_argument('--turns', '-t', type=int, default=5)
    parser.add_argument('--verbose', '-v', action='store_true')

    args = parser.parse_args()

    system = OrchestratorWithAnalytics(
        config_path=args.config,
        discovery_url=args.discovery_url
    )
    system.run_conversation(num_turns=args.turns)
Bash Script for Easier Usage
In addition to the Python script, there’s a bash wrapper script (run_heist.sh) that simplifies usage. Instead of always typing python3 run_heist.py --config ... --turns ..., you can simply use ./run_heist.sh --turns 5. I had to learn this format myself. Learned something new again 😃 That’s why I’ll try to break it down in more detail below.
# run_heist.sh

# Define default values (used when no parameters are passed)
CONFIG="agents_config.yaml"
TURNS=5
DISCOVERY_URL="http://localhost:8006"

# Loop through all passed parameters ($# = number of parameters)
while [[ $#--gt-0-| -gt 0 ]]; do
    case $1 in  # $1 is the current parameter
        -c|--config)
            CONFIG="$2"      # $2 is the value after the parameter
            shift 2          # Shift by 2 positions (parameter + value)
            ;;
        -t|--turns)
            TURNS="$2"
            shift 2
            ;;
        -d|--discovery-url)
            DISCOVERY_URL="$2"
            shift 2
            ;;
        -v|--verbose)
            VERBOSE="-v"     # Flag without value
            shift            # Shift by 1 position
            ;;
        *)
            echo "Unknown option: $1"
            exit 1           # Exit script with error
            ;;
    esac
done

# Change to directory where script is located
cd "$(dirname "$0")"

# Call Python script with collected parameters
python3 run_heist.py --config "$CONFIG" --turns "$TURNS" --discovery-url "$DISCOVERY_URL" $VERBOSE
Step-by-Step
1. Setting Default Values
CONFIG="agents_config.yaml"
TURNS=5
These values apply when no parameters are passed.
2. Understanding the while Loop
When you break down the while loop, then…:
while: Obviously, a normal while loop[[...]]: This is the test syntax in Bash. It’s similar to anifstatement in other languages and checks whether something is true or false.$#: Number of parameters being passed../run_heist.sh --turns 10 --verbosefor example yields$#=3.-gt: This is the comparison operator “greater than”.0: Well… I’d say that explains itself 😉
The Parameter Variables:
$1= first parameter (e.g.--turns)$2= second parameter (e.g.10)$3= third parameter (e.g.--verbose)- etc.
3. Understanding Case
I wasn’t familiar with case statements in bash either. What happens here?
case $1 in: Here the case statement begins and variable$1is checked.-v|--verbose: Checks if$1equals-vOR--verbose. The)closes the pattern.VERBOSE="-v": The command that is executed if the above pattern matches.;;: End of the case. Like abreakin other languages and absolutely required to avoid syntax errors.*): Catch-all or default case. Theelseso to speak.esac: End of the case statement and “case” spelled backwards.
I’ll explain the rest with a simple example.
4. A Concrete Example
For example, we call ./run_heist.sh --turns 10 --verbose.
1st Iteration:
$1 = "--turns"
$2 = "10"
$# = 3

case $1 in
    -t|--turns)
        TURNS="10"      # Store the value
        shift 2         # Remove "--turns" and "10"
After shift 2:
$1becomes--verbose(was previously$3)$#becomes 1
2nd Iteration:
$1 = "--verbose"
$# = 1

case $1 in
    -v|--verbose)
        VERBOSE="-v"
        shift           # Remove only "--verbose"
After shift:
$#becomes 0- Loop ends
4. Calling Python Script
At the end, the collected values are used:
python3 run_heist.py --config "$CONFIG" --turns "$TURNS" --discovery-url "$DISCOVERY_URL" $VERBOSEOur example becomes:
python3 run_heist.py --config "agents_config.yaml" --turns "10" --discovery-url "http://localhost:8006" -vExamples:
# Uses all default values (TURNS=5, CONFIG=agents_config.yaml, etc.)
./run_heist.sh

# Overrides only TURNS (others remain default)
./run_heist.sh --turns 10

# Overrides multiple values
./run_heist.sh --turns 3 --config custom.yaml --verbose
You don’t have to specify every parameter each time. Default values are automatically used, and you only override what you want to change.
Dashboard Server CLI
The dashboard server also accepts CLI config:
# dashboard_server.py
parser = argparse.ArgumentParser(description='Heist Analytics Dashboard Server')
parser.add_argument('--config', '-c', type=str, default=None,
                    help='Path to config file (default: day_19/config.yaml)')
args, unknown = parser.parse_known_args()

config = load_config(args.config)
If you want to start it with a custom config, just pass it:
python3 dashboard_server.py --config custom_config.yamlDashboard Server
The server uses the local SessionAnalytics copy, which has minor changes compared to Day 18.
from fastapi import FastAPI, WebSocket, WebSocketDisconnect
from fastapi.responses import FileResponse
from session_analytics import SessionAnalytics  # Local copy!
import yaml
from pathlib import Path

# Load configuration
def load_config(config_file: str = None) -> dict:
    if config_file is None:
        config_file = str(Path(__file__).parent / "config.yaml")

    config_path = Path(config_file)
    if not config_path.is_absolute():
        config_path = Path(__file__).parent / config_file

    with open(config_path, 'r') as f:
        return yaml.safe_load(f)

config = load_config()
db_path = config['database']['path']

app = FastAPI(title=config['server']['title'])
analytics = SessionAnalytics(db_path)

@app.get("/")
async def get_dashboard():
    """Serve the Cyberpunk dashboard HTML."""
    return FileResponse(Path(__file__).parent / "dashboard.html")
API Endpoints
These are the same endpoints as Day 18, but supplemented with the local analytics instance:
@app.get("/api/sessions")
async def get_sessions():
    sessions = analytics.list_sessions()
    return {"sessions": sessions, "total_sessions": len(sessions)}

@app.get("/api/session/{session_id}")
async def get_session_details(session_id: str):
    return analytics.get_session_details(session_id)

@app.get("/api/tool-stats")
async def get_tool_stats():
    stats = analytics.get_tool_statistics()
    return {"tools": stats["tool_statistics"]}

@app.get("/api/agent-activity/{session_id}")
async def get_agent_activity(session_id: str):
    activity_data = analytics.get_agent_activity(session_id)
    return {
        "session_id": session_id,
        "activity": activity_data["agent_activity"]
    }
WebSocket for Real-Time Updates
WebSockets enable a bidirectional, persistent connection between client (browser) and server. Unlike normal HTTP requests (where the client asks and the server responds), both sides can send messages at any time. This is perfect for live updates in the dashboard - the server can immediately push new session data to all connected browsers without them having to constantly ask.
WebSocket support requires additional dependencies, which I only stumbled upon when executing 😅
pip install 'uvicorn[standard]' websocketsThe Connection Manager manages all active WebSocket connections. When multiple users open the dashboard simultaneously, each has their own WebSocket connection. The manager stores all these connections in a list and can then send messages to all of them simultaneously (broadcasting).
class ConnectionManager:
    def __init__(self):
        self.active_connections: List[WebSocket] = []

    async def connect(self, websocket: WebSocket):
        await websocket.accept()
        self.active_connections.append(websocket)

    def disconnect(self, websocket: WebSocket):
        self.active_connections.remove(websocket)

    async def broadcast(self, message: dict):
        for connection in self.active_connections:
            try:
                await connection.send_json(message)
            except Exception:
                pass

manager = ConnectionManager()

@app.websocket("/ws")
async def websocket_endpoint(websocket: WebSocket):
    await manager.connect(websocket)
    try:
        await websocket.send_json({
            "type": "connected",
            "message": "Connected to Neural.Net",
            "timestamp": datetime.now().isoformat()
        })
        while True:
            data = await websocket.receive_text()
            await websocket.send_json({
                "type": "echo",
                "message": data,
                "timestamp": datetime.now().isoformat()
            })
    except WebSocketDisconnect:
        manager.disconnect(websocket)
However, I had to get assistance here, as with the frontend.
Frontend: Cyberpunk 2077 Design
The dashboard uses a futuristic cyberpunk design with neon colors and is, as mentioned, completely vibecoded.
First, about Cascading Style Sheets (CSS). This is the language that defines the appearance of web pages. Colors, fonts, sizes, positions, animations, …
Color Scheme
/* Neon Colors */
--cyan: #00ffff;
--magenta: #ff00ff;
--yellow: #ffff00;
--neon-green: #00ff00;
--neon-red: #ff0000;

/* Background */
background: #0a0e27;
Animations
Neon Flicker:
@keyframes neon-flicker {
    0%, 19%, 21%, 23%, 25%, 54%, 56%, 100% {
        text-shadow:
            0 0 10px #00ffff,
            0 0 20px #00ffff,
            0 0 30px #00ffff,
            0 0 40px #00ffff;
    }
    20%, 24%, 55% {
        text-shadow: none;
    }
}

h1 {
    animation: neon-flicker 3s infinite;
}
Glitch Effect:
@keyframes glitch {
    0% { transform: translate(0); }
    20% { transform: translate(-2px, 2px); }
    40% { transform: translate(-2px, -2px); }
    60% { transform: translate(2px, 2px); }
    80% { transform: translate(2px, -2px); }
    100% { transform: translate(0); }
}

.agent-badge.suspect {
    animation: glitch 0.3s infinite;
}
Scan Line:
@keyframes scan-line {
    0% { transform: translateY(-100%); }
    100% { transform: translateY(100vh); }
}

body::before {
    content: '';
    position: fixed;
    width: 100%;
    height: 3px;
    background: linear-gradient(90deg, transparent, #ff00ff, transparent);
    animation: scan-line 8s linear infinite;
}
Typography
Typography is the design of fonts and part of CSS. Technically speaking, they’re simply CSS rules.
<link href="https://fonts.googleapis.com/css2?family=Orbitron:wght@400;700;900&family=Rajdhani:wght@300;500;700&display=swap" rel="stylesheet">h1 {
font-family: 'Orbitron', sans-serif;
font-size: 3em;
font-weight: 900;
text-transform: uppercase;
letter-spacing: 5px;
color: #00ffff;
}
body {
font-family: 'Rajdhani', sans-serif;
color: #00ffff;
}UI Elements
This is about UI elements, the individual visual building blocks of the user interface (or User Interface). These are all interactive or visual components that a user sees.
Cards with Neon Borders:
.card {
    background: rgba(10, 14, 39, 0.9);
    border: 2px solid #00ffff;
    padding: 25px;
    box-shadow:
        0 0 20px rgba(0, 255, 255, 0.3),
        inset 0 0 30px rgba(0, 255, 255, 0.05);
    transition: all 0.3s;
}

.card:hover {
    border-color: #ff00ff;
    box-shadow:
        0 0 30px rgba(255, 0, 255, 0.5),
        inset 0 0 40px rgba(255, 0, 255, 0.1);
}
Agent Badges:
.agent-badge {
    padding: 15px 25px;
    background: rgba(0, 0, 0, 0.7);
    border: 2px solid #00ffff;
    font-family: 'Orbitron', sans-serif;
    text-transform: uppercase;
    cursor: pointer;
    transition: all 0.3s;
}

.agent-badge:hover {
    background: rgba(0, 255, 255, 0.2);
    border-color: #ff00ff;
    box-shadow: 0 5px 20px rgba(255, 0, 255, 0.5);
}
Chart.js Integration
Chart.js is a JavaScript library for creating interactive charts and visualizations in the browser and is used in the dashboard to visually display analytics data.
function updateActivityChart(data) {
    const ctx = document.getElementById('activityChart').getContext('2d');

    const agents = data.activity.map(a => a.agent_name.toUpperCase());
    const messageCounts = data.activity.map(a => a.message_count);

    const colors = ['#00ffff', '#00ff00', '#ffff00', '#ff00ff'];

    activityChart = new Chart(ctx, {
        type: 'bar',
        data: {
            labels: agents,
            datasets: [{
                label: 'MESSAGE COUNT',
                data: messageCounts,
                backgroundColor: colors.map(c => c + '80'),  // 50% opacity
                borderColor: colors,
                borderWidth: 2
            }]
        },
        options: {
            responsive: true,
            scales: {
                x: {
                    ticks: { color: '#00ffff', font: { family: 'Orbitron' } },
                    grid: { color: 'rgba(0, 255, 255, 0.1)' }
                },
                y: {
                    ticks: { color: '#00ffff', font: { family: 'Orbitron' } },
                    grid: { color: 'rgba(0, 255, 255, 0.1)' },
                    beginAtZero: true
                }
            },
            plugins: {
                legend: {
                    labels: {
                        color: '#ffff00',
                        font: { family: 'Orbitron', size: 12 }
                    }
                }
            }
        }
    });
}
We’ve now covered the architecture, the database, the API endpoints, the WebSocket integration, and the frontend with Chart.js.
In the following section, we’ll look at how to start the dashboard, run heist sessions, and use the visualizations.
Setup & Usage
The dashboard system consists of multiple components that need to be started in the correct order. First we need the database, then the backend services for the Heist Runner, and finally the dashboard server itself.
1. Initialize Database
Before we can start anything, the analytics database must exist. The init script creates all required tables with the Day 18/19 schema.
cd day_19
python3 init_database.py
This creates heist_analytics.db with the appropriate schema (sessions, agents, messages, tool_usage, etc.). This database is used both by the Heist Runner for writing and by the dashboard for reading.
2. Start Services
If we want to generate new heist sessions, we need the complete Day 16/17 infrastructure. The dashboard itself can also be used without running services - it will then only show already stored data.
Terminal 1 - Day 16 Services:
./day_16/start_services.shTerminal 2 - Discovery Server:
./day_17/start_discovery_server.shTerminal 3 - LM Studio:
- Open LM Studio
- Load model
google/gemma-3n-e4b - Start server (Port 1234)
These three services (OAuth, Memory, Tool Discovery, and LM Studio) are the foundation for multi-agent conversation. Without them, the Heist Runner cannot generate new sessions.
3. Run Heist Session
Now that all services are running, we can start a heist session. The run_heist.sh script makes this particularly easy since we don’t have to specify all parameters every time.
Terminal 4:
cd day_19
./run_heist.sh --turns 5
Output:
🔧 Initializing orchestrator...
[planner] 🔍 Discovered 4 tools
[hacker] 🔍 Discovered 4 tools
[safecracker] 🔍 Discovered 4 tools
[mole] 🔍 Discovered 4 tools
✓ Session initialized: heist_1766152674
✓ Database: heist_analytics.db
✓ Agents: planner, hacker, safecracker, mole

🚀 Starting conversation (5 turns)...
The session is now running and writing all data to heist_analytics.db. Every agent message, every tool call, every action is stored. Once the session is complete, we can visualize it in the dashboard.
4. Start Dashboard
While the heist session is running (or afterwards), we can start the dashboard. It reads the data from the database and displays it visually.
Terminal 5:
./day_19/start_dashboard.shOutput:
🔧 Starting Dashboard Server...
🚀 Launching Dashboard Server on port 8007...
✅ Dashboard Server started (PID: 21660)

📋 Dashboard:
   🌐 http://localhost:8007
   📊 http://localhost:8007/docs - API Documentation
The dashboard server is now running on port 8007 and ready to present the analytics data. In addition to the web UI, there’s also interactive API documentation under /docs that shows all available endpoints. We’ve seen this before.
5. Open Browser
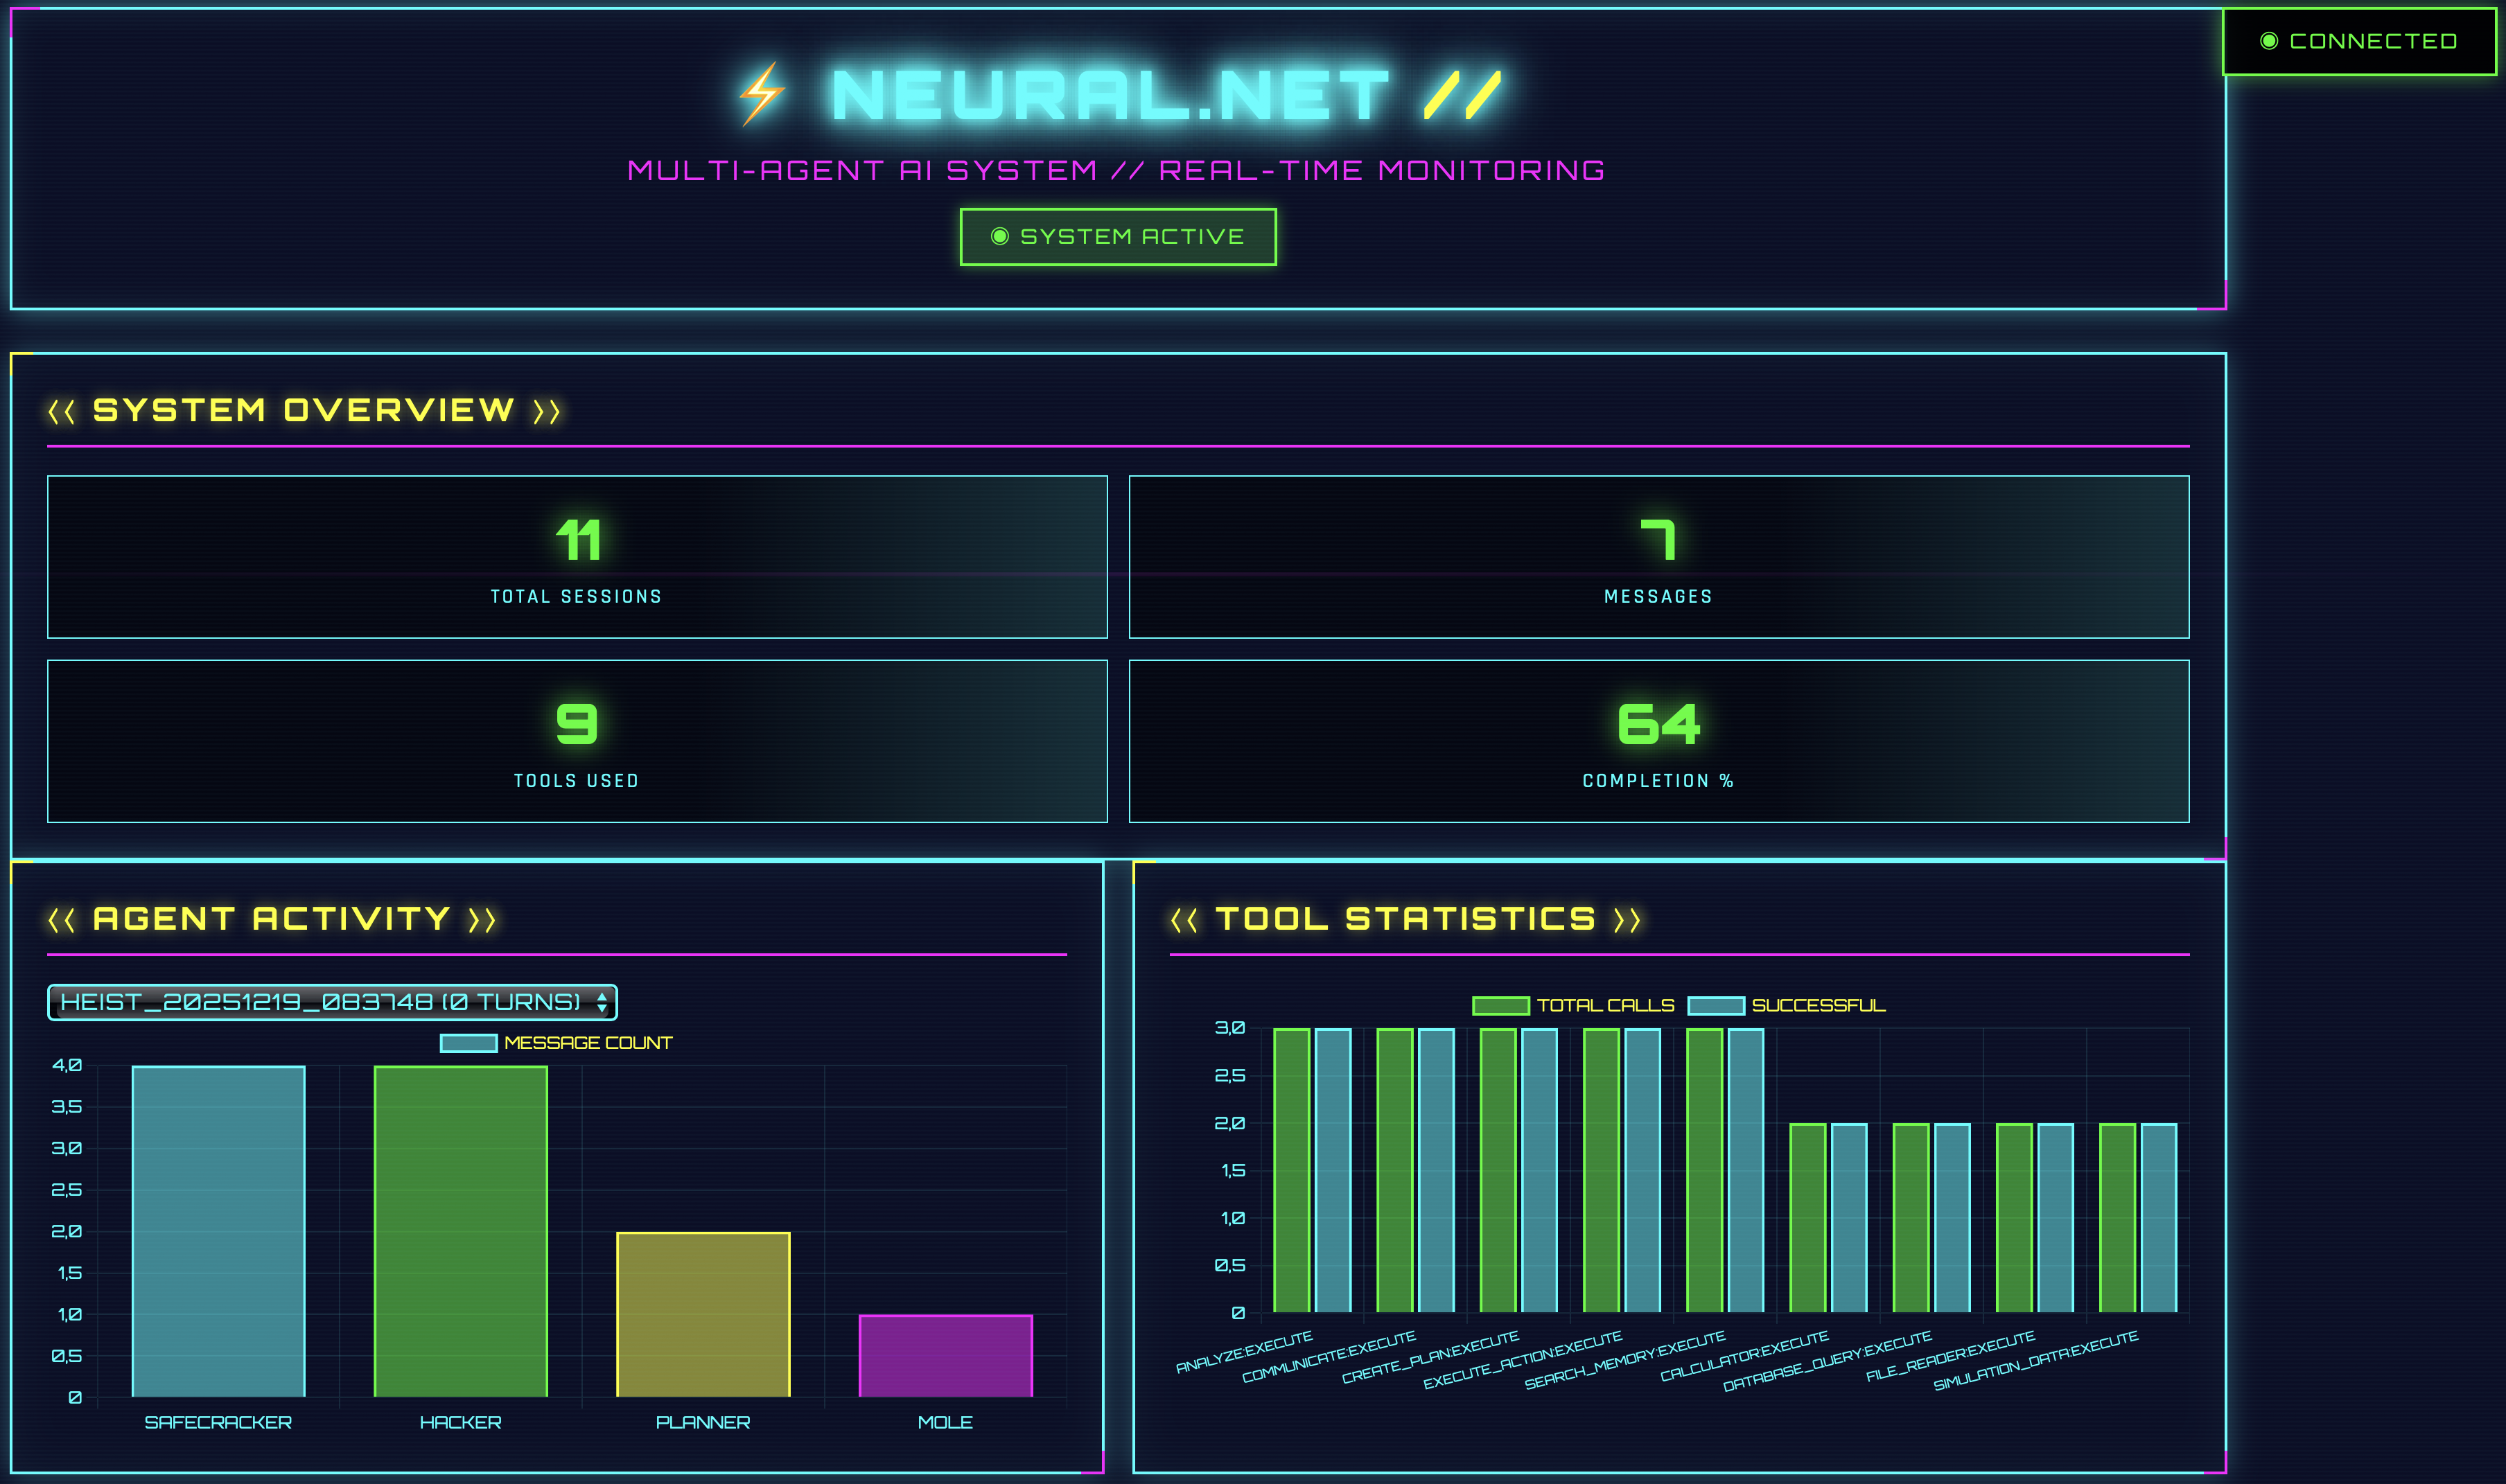
Now we can open the dashboard in the browser and see the heist analytics in full cyberpunk glory.
http://localhost:8007
The dashboard shows different areas, each visualizing different aspects of the multi-agent conversation:
- ⟨⟨ SYSTEM OVERVIEW ⟩⟩: Overall statistics like Total Sessions, Completion Rate, Average Turns
- ⟨⟨ AGENT ACTIVITY ⟩⟩: Bar chart with message counts per agent
- ⟨⟨ TOOL STATISTICS ⟩⟩: Visualization of tool usage with success rates
- ⟨⟨ NEURAL FEED ⟩⟩: Scrollable list of the live conversation with color coding per agent
- ⟨⟨ THREAT DETECTION ⟩⟩: UI for the mole game (not yet functional)
If the heist session is still running, the dashboard updates dynamically via WebSocket connections. You can see new messages arriving in real-time and the charts updating.
Stop Dashboard
When we’re done with the analysis, we can shut down the dashboard server.
./day_19/stop_dashboard.shTroubleshooting
For issues with the dashboard setup (WebSocket errors, missing database, empty session list, port conflicts, etc.), there are detailed solutions in the README.md
Summary
Day 19 makes multi-agent analytics visible. What previously came as JSON responses from a REST API is now visualized in a cyberpunk-inspired web dashboard. The system builds on Day 18’s analytics format and extends it with a FastAPI backend with WebSocket support and a Chart.js frontend.
The dashboard itself is standalone and only requires access to the SQLite database. The Heist Runner, however, integrates with the Day 16/17 infrastructure to generate new multi-agent sessions. Both components are configurable via YAML files and offer CLI integration for flexible usage.
The visual design combines neon colors with futuristic typography and animations and is completely vibecoded 🤷♂️ Real-time updates via WebSockets enable live monitoring during running heist sessions. Day 20 will build on this and add interactive control capabilities. At least that’s the plan.