Due to recent activities, I have been looking into the topic of job scheduling and, as a first step, job queues. This involves planning and executing tasks that are to be performed at a specific time or at regular intervals. In this article, I would like to show you how I implemented this function with Python. The first script is a queue for a defined number of threads. In addition, I use a simple Streamlit interface to manage the scheduled tasks.
Why job scheduling/queue?
I was faced with the challenge of wanting to use a queue for a Python framework I was using. Because the execution of a single job can sometimes take up to several days and is triggered by me via a Streamlit interface on a server, I wanted to automate the execution and processing of the jobs. Of course, there are already ready-made packages for this. However, some of these were too extensive for me or required additional software installations that I cannot/am not allowed to perform on the server.
Last but not least, it’s also fun to take on something like this yourself.
The code
In the following sections, I will show you the code I used to create my version of a job scheduler in combination with Streamlit. I will try to go into detail and explain the most important points.
There will be 4 files:
countdown.py: This file contains the job to be executed.
queue_processor.py: Contains the functions needed to organize the queue.
job_queue.txt: This file lists the jobs along with their status, UUID, and parameters.
queue_test_streamlit.py: This is where the Streamlit interface or app is created.
The job to be executed countdown.py
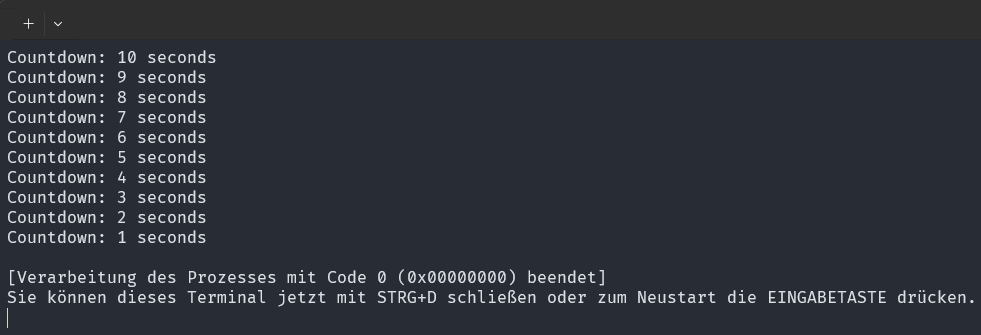
Let’s start with the job to be executed. This is a simple countdown to test the scheduler quickly and easily. The job is called from queue_processor.py. The call also contains a parameter, the time that the countdown should count down.
import sysimport timedef countdown(seconds): for i in range(seconds, 0, -1): print(f"Countdown: {i} seconds") time.sleep(1)def main(): if len(sys.argv) < 2: print("Error: Missing parameter") sys.exit(1) try: seconds = int(sys.argv[1]) countdown(seconds) except ValueError: print("Error: Invalid parameter") sys.exit(1)if __name__ == "__main__": main()
The output might look like this, for example:
Output of a single job
The processor queue_processor.py
This file contains all the functions needed to organize the jobs. I will describe the functions individually below.
Imports
First, a few imports must be made. We also set the maximum number of synchronous jobs and a few paths.
import threadingimport subprocessimport uuidimport os# Maximum number of concurrent jobsMAX_CONCURRENT_JOBS = 3# Global variable for tracking active threadsactive_threads = 0lock = threading.Lock()current_path = os.getcwd()JOBS_FILE = os.path.join(current_path, "Simple_Example", "job_queue.txt")
Add a job to the queue: add_job_to_queue(job_path, parameter)
Adds a new job to the queue by generating a unique job ID (UUID) and writing it to the job_queue.txt file. The job is then added to the job_queue queue (job_queue.put((job_id, job_path, parameter))).
def add_job_to_queue(job_path, parameter):
    job_id = str(uuid.uuid4())
    with lock:
        with open(JOBS_FILE, "a") as file:
            file.write(f"{job_id} {job_path} {parameter} PENDING\n")
    process_jobs()
    return job_id
What is a UUID?
A UUID (Universally Unique Identifier) is a 128-bit value used to uniquely identify information in distributed systems. It consists of 32 hexadecimal characters divided into five groups and separated by hyphens (e.g., 123e4567-e89b-12d3-a456-426614174000). UUIDs are virtually guaranteed to be unique because they are based on a combination of factors such as time, space (e.g., MAC address), and random or pseudo-random numbers. This makes them ideal for uniquely identifying objects in distributed systems without the need for central coordination.
UUIDs come in different versions:
Version 1: Based on time and MAC address.
Version 2: Based on time, MAC address, and POSIX UID/GID.
Version 3: Based on MD5 hash of a namespace and name.
Version 4: Based on random numbers.
Version 5: Based on SHA-1 hash of a namespace and name.
Version 4 is most commonly used because it is randomly generated and offers a high degree of uniqueness.
Update the status of a job: update_job_status(job_id, status)
Updates the status of a job in the job_queue.txt file. The function uses a lock to ensure that the file is updated safely. The function is called by the ‘execute_job()’ function.
def update_job_status(job_id, status):with lock: jobs = load_jobs() with open(JOBS_FILE, "w") as file: for job in jobs: if job[0] == job_id: file.write(" ".join(job[:-1] + (status,)) + "\n") else: file.write(" ".join(job) + "\n")
What is or does the lock?
The lock ensures that only one thread can access the file at a time. This prevents multiple threads from making changes at the same time and corrupting the file.
Executes a job by starting a new process that runs the specified script with the specified parameters. The status of the job is updated before and after execution.
def execute_job(job_id, job_path, parameter):
    global active_threads
    update_job_status(job_id, "RUNNING")
    process = subprocess.Popen(
        ["cmd", "/C", ‘python’, job_path, parameter],
        creationflags=subprocess.CREATE_NEW_CONSOLE)
    process.wait()
    update_job_status(job_id, "COMPLETED")
    with lock:
        active_threads -= 1
    process_jobs()
The line subprocess.Popen starts a new process that executes the specified Python script (job_path, i.e., countdown.py) with the specified parameter (parameter).
["cmd", "/C", "python", job_path, parameter]: This is the command line that is executed. cmd /C starts the Windows command prompt and executes the following command (python job_path parameter or python countdown.py 10).
creationflags=subprocess.CREATE_NEW_CONSOLE: This flag creates or opens a new console for the started process.
The line process.wait() waits for the started process to finish before the code continues. This ensures that the job is completely finished before the status is updated to COMPLETED.
Remove job from queue with remove_job_from_queue(job_id)
Removes a job from the job_queue.txt file, keeping all lines except the one with the specified job ID/UUID. The function also uses a lock again for safe file operation.
def remove_job_from_queue(job_id):
    with lock:
        with open(JOBS_FILE, "r+") as file:
            lines = file.readlines()
            file.seek(0)
            file.truncate()
            for line in lines:
                parts = line.strip().split()
                if parts[0] != job_id:
                    file.write(line)
Display all jobs with get_all_jobs()
Reads all jobs from the file job_queue.txt and returns a list of dictionaries containing the job ID, job path, parameters, and status of each job.
def get_all_jobs():
    with lock:
        return load_jobs()
def load_jobs():
    jobs = []
    with open(JOBS_FILE, "r") as file:
        for line in file:
            parts = line.strip().split()
            jobs.append((parts[0], parts[1], parts[2], parts[3]))
    return jobs
Executing a job with process_jobs()
Monitors the job_queue and executes jobs as soon as they become available. The function runs in an infinite loop and uses a lock to manage the queue safely.
def process_jobs():
    global active_threads
    with lock:
        jobs = load_jobs()
        for job in jobs:
            if job[3] == "PENDING" and active_threads < MAX_CONCURRENT_JOBS:
                job_id, job_path, parameter, _ = job
                active_threads += 1
                threading.Thread(target=execute_job, args=(job_id, job_path, parameter)).start()
                break
Starting the job processing thread
Starts a new thread that executes the process_jobs function. The thread runs in the background and continuously processes jobs from the queue.
This text file stores the jobs with their UUIDs, parameters, and respective statuses. Among other things, this file is used to fetch new jobs and mark completed ones as such.
The following Streamlit app provides a user interface for managing the job queue. Users can add jobs, update the queue, and remove jobs from the queue. The app is really nothing special, but it does the job.
The functions in question are imported from queue_processor.
import streamlit as stimport pandas as pdfrom queue_processor import add_job_to_queue, get_all_jobs, remove_job_from_queuedef main(): st.title("Python Job Queue") job_path = st.text_input("Job Path", value="Simple_Example/countdown.py") parameter = st.text_input("Parameter", value="10") if st.button("Add Job"): job_id = add_job_to_queue(job_path, parameter) st.success(f"Job {job_id} added to queue") if st.button("Refresh Job Queue"): jobs = get_all_jobs() df = pd.DataFrame(jobs) st.table(df) job_id = st.text_input("Job UUID") if st.button("Remove Job from queue"): remove_job_from_queue(job_id) st.success(f"Job {job_id} removed from queue")if __name__ == "__main__": main()
There are two input fields.
In job_path, you define the path to the file to be executed, as in this example to countdown.py.
Parameter is an argument that is passed to the job. Whether an argument is necessary depends entirely on the use case and job. In this example, the wait time (in seconds) is passed.
Then there are two buttons:
The Add Job button adds the aforementioned job to the queue.
The Refresh Job Queue button updates and displays the jobs listed in the queue.
Now there is another input field. In Job UUID, you can enter the UUID of a job to be canceled in this app. If you confirm the entry with the Remove Job from queue button, the job is deleted from the queue.
Running the example
This section is about testing the job scheduler. First, of course, a development environment with the appropriate dependencies must be set up.
Installing the dependencies
The following is just a summary:
First, navigate to the folder with the project (e.g., within the command line).
Create the environment with python -m venv .venv.
C:\***\Python_Project>python -m venv .venv
This creates the development environment in the folder :file_folder: .venv.
Use the command activate in one of the subfolders to activate the environment and install packages, for example.
C:\***\Python_Project>venv\Scripts\activate
We only need two more packages, pandas and streamlit.
All other packages should have come with your Python installation.
Starting the Streamlit app
We are now in the project folder and have installed all packages, created files, and filled them with code. Next, I start the Streamlit interface.
(.venv) C:\***\Python_Project>streamlit run queue_test_streamlit.py
We get the following output:
(.venv) C:\***\Python_Project>streamlit run queue_test_streamlit.py
  You can now view your Streamlit app in your browser.
  Local URL: http://localhost:8501
  Network URL: http://123.123.123:8501
At the same time, the browser should open and call up the above URL, consisting of IP or Localhost and port, IP. If this does not happen, you can also call up the URL manually.
Streamlit interface
And here you can now diligently test the individual functions.
Summary
In the sections above, we created a simple job scheduler in Python. This scheduler is populated and organized with the help of, but not exclusively by, Streamlit. You can add jobs, delete them, or view the queue.
The Streamlit interface offers an easy way to interact with the scheduler. However, you can also call the commands in other ways.
 Output of a single job
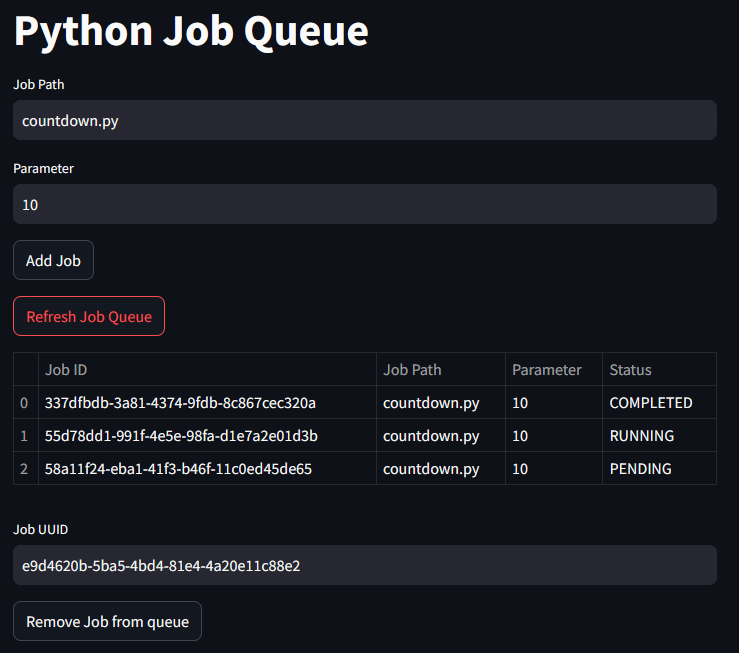 Streamlit interface